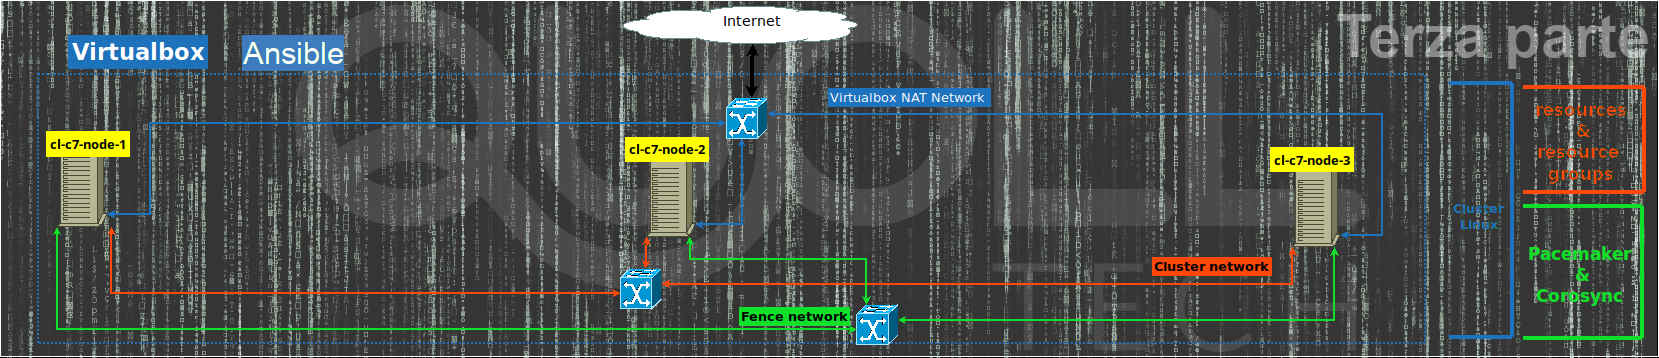
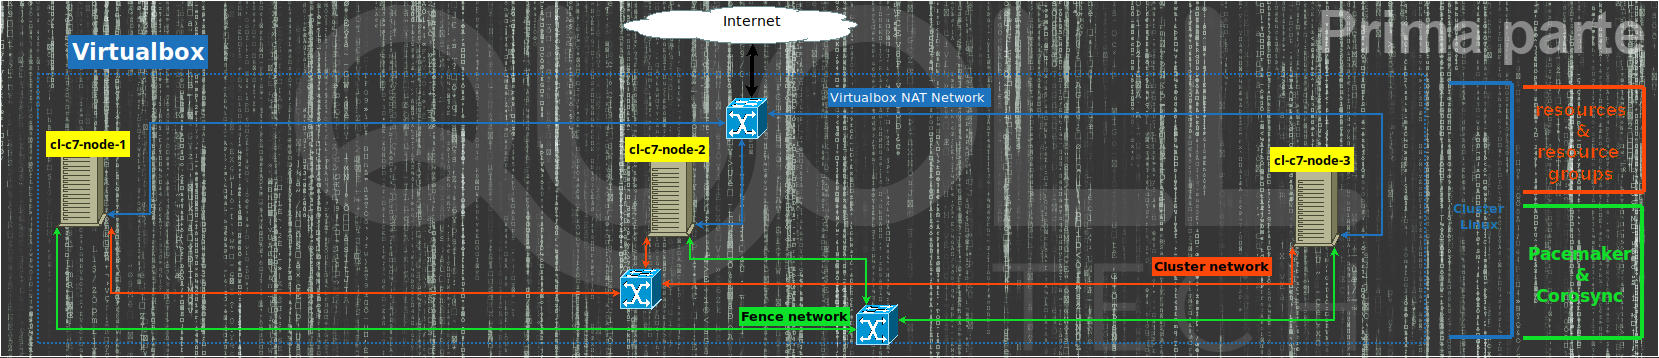
Introduction
In this article we create a cluster on Linux with Pacemaker and Corosync using the pcs commands (Pacemaker/Corosync Configuration System).
Initially, we analyze step by step the creation of a Linux cluster on VirtualBox environment and finally automate using Vagrant.
The main needs to create a cluster instead of a single server for a company can be summarized with:
- have a redundancy of the servers/services in the event that a failure occurs;
- have the possibility to easily update the server by working first on one node put under maintenance than on others;
- to be able to make a complete and consistent backup while the services on the other nodes are active.
Cluster root node installation
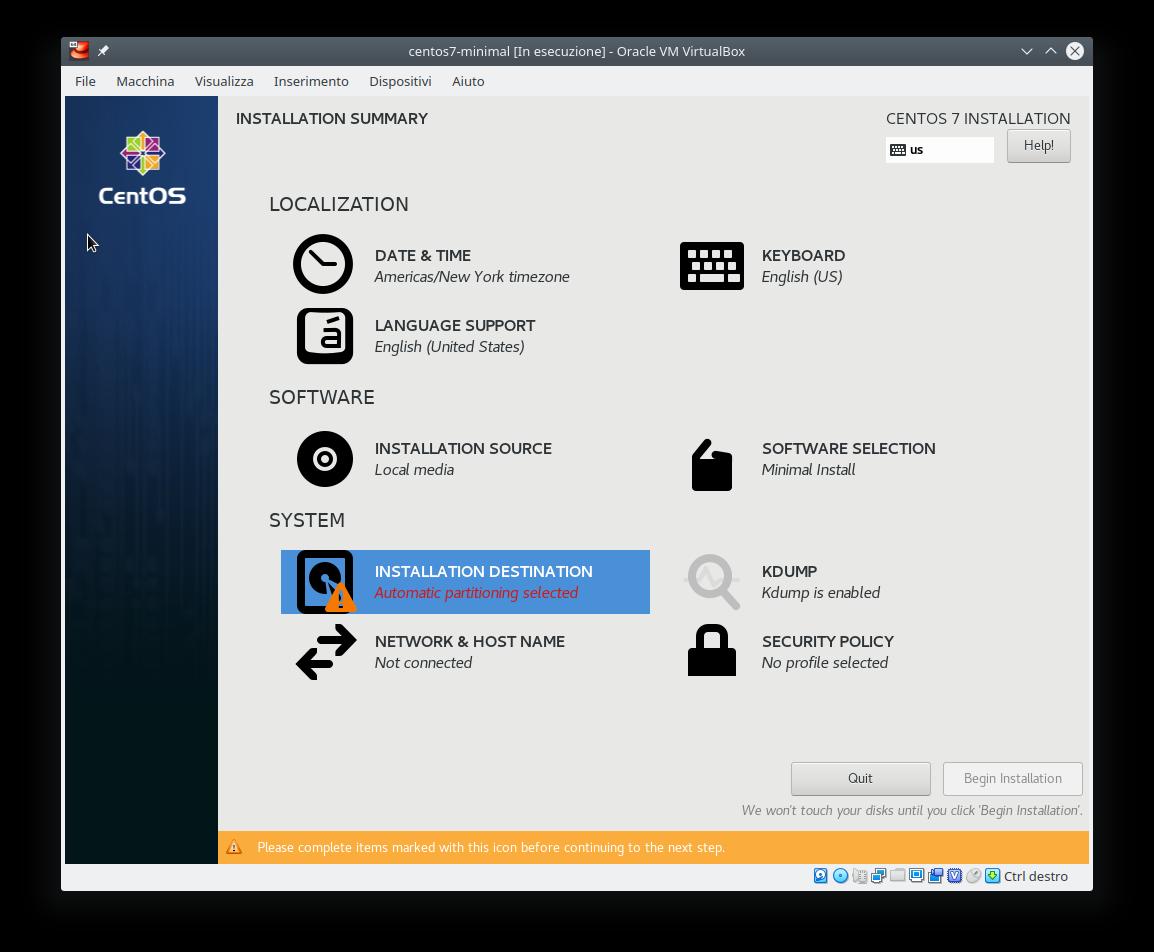
Suppose we have already installed Virtualbox and downloaded the ISO of Centos 7 then we create a new Centos7 vm with:
- at least 1GB of memory;
- with name for instance centos7-minimal (Linux – RedHat 64 bit);
- 3 network cards and to sum up:
- the first “NAT” for normal navigation;
- the second as “Internal network” that is to say to manage the cluster network (we will use the subnet 192.168.33.0/24);
- the last as “Internal network” to manage the fence/stonith operation (we will use the subnet 192.168.43.0/24);
- we add 1 disc to the IDE/SATA controller of at least 15GB.
Graphics mode

Vm name and SO 
Memory 
Disc type 
Disc size 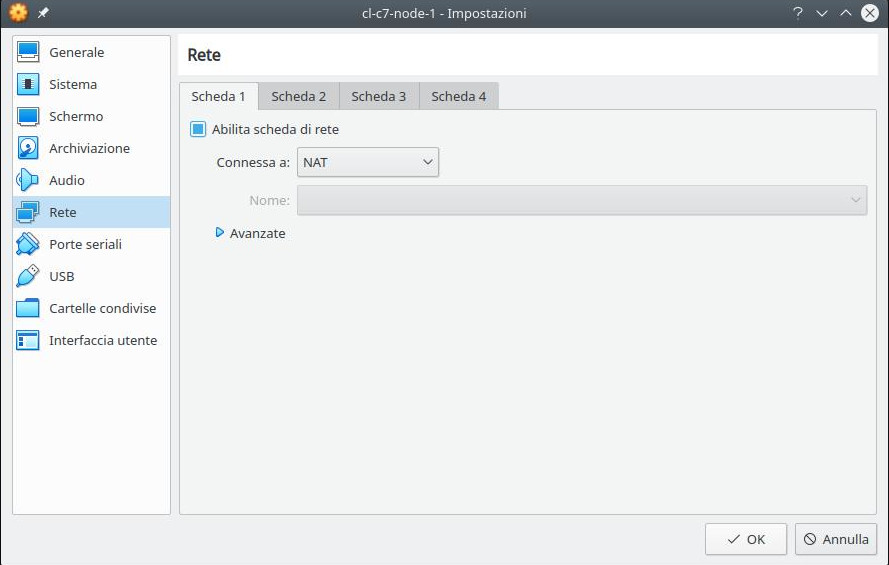
NAT 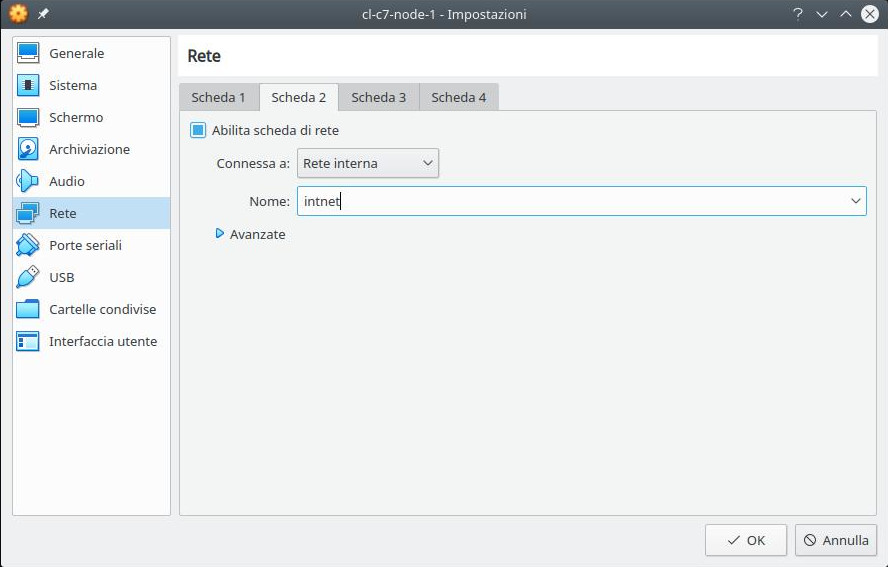
Cluster network 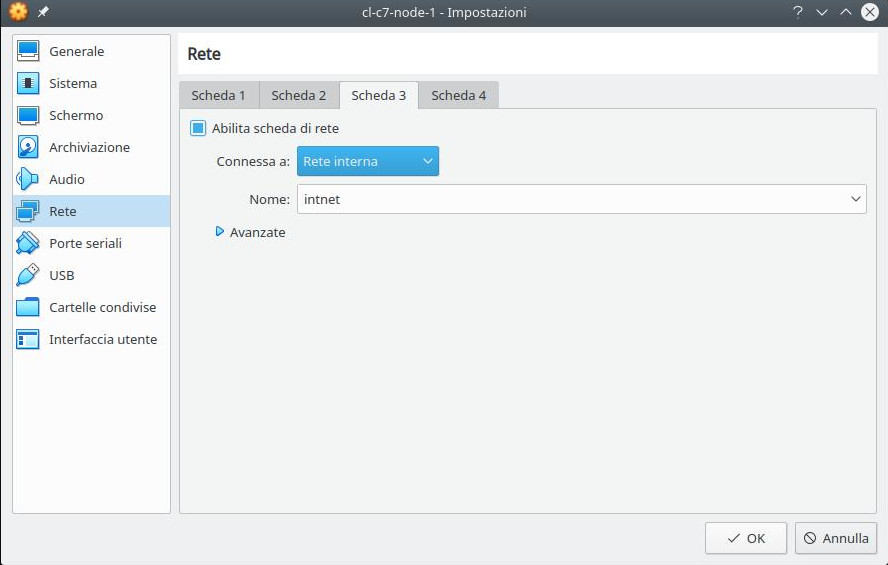
Fence network 
iso centos 7 minimal
If we want to enable integration with the mouse, we have to select “System” then “Pointing tablet” in the “Pointing device” item and not the default “Mouse PS / 2” since with Centos 7 it seems there are problems.
So we can move the mouse outside the window of the new VM without having to press the “Home” button.
Alternative mode: terminal
Using the “VBoxManage” command we can do the same operations done above in graphic mode but faster.
Check the “ISO” variable below the valid path where the centos7-minimal iso is.
VBoxManage createvm --name centos7-minimal --ostype RedHat_64 --register
VBoxManage modifyvm centos7-minimal --vram 15
VBoxManage modifyvm centos7-minimal --mouse usbtablet --usbehci on
VBoxManage modifyvm centos7-minimal --nic1 nat
VBoxManage modifyvm centos7-minimal --nic2 intnet
VBoxManage modifyvm centos7-minimal --nic3 intnet
VBoxManage modifyvm centos7-minimal --memory 1024

cfg_row=$(VBoxManage showvminfo --machinereadable "centos7-minimal" | grep '^CfgFile')
eval "$cfg_row"
vm_basedir=$(dirname "$CfgFile")
VBoxManage createmedium disk --filename "${vm_basedir}/centos7-minimal.vdi" --size 15360 --format VDI
VBoxManage storagectl centos7-minimal --name "SATA Controller" --add sata --controller IntelAhci
VBoxManage storageattach centos7-minimal --storagectl "SATA Controller" --port 0 --device 0 --type hdd --medium "${vm_basedir}/centos7-minimal.vdi"
VBoxManage storagectl centos7-minimal --name "IDE Controller" --add ide --controller PIIX4
ISO="/dati1/lavoro/iso/CentOS-7-x86_64-Minimal-1810.iso"
VBoxManage storageattach centos7-minimal --storagectl "IDE Controller" --port 1 --device 0 --type dvddrive --medium "$ISO"
Centos 7 minimal installation
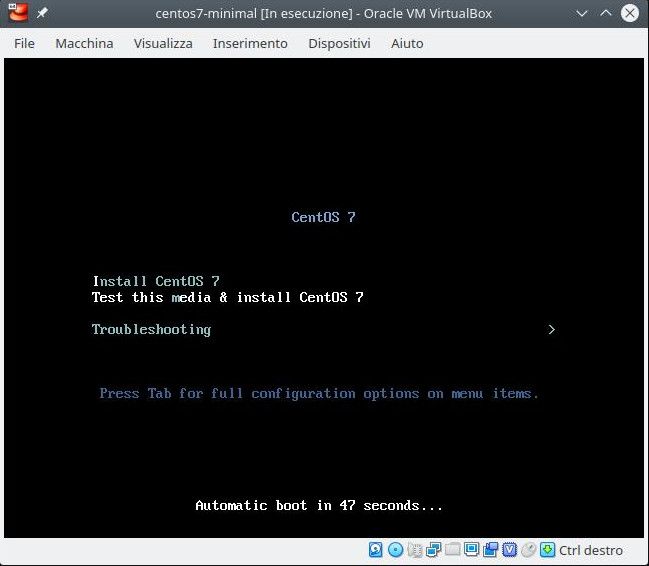
Finally, to install we start the VM graphically via the Virtualbox interface or alternatively via the command
VBoxManage start centos7-minimalwhere “centos7-minimal” is the name we have given to vm so we follow the simple screens of the Centos 7 installer.

Boot menu 
Choice of language 
Configurations 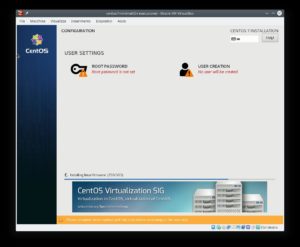
User managents and root password


Cluster root node configuration
We enter a bash shell of the newly installed vm then we start the configuration that will be valid for all three nodes of the cluster and that must be done only once.
Environment: keyboard and local language
If we need to configure a keyboard layout different from that of the installation, for example for Italian we run the command:
localectl set-keymap itWe could also choose other layouts for Italian based on our keyboard such as “it2” or “it-winkeys” or see the complete list of layouts run the command
localectl list-keymaps
If necessary we set the “locale” for the proper functioning of the console through the commands:
localectl set-locale LANG=en_US.utf8
localectl status
Network interface for navigation
If we have done the minimal installation of Centos 7, the network will not have been configured so let’s test it with the command:
ip a
We verify that the NAT interface, the first in the list excluding “lo” is enp0s3 and enable it by putting the ONBOOT = yes parameter in the file /etc/sysconfig/network-scripts/ifcfg-enp0s3 and finally restart the network service:
sed -i 's/ONBOOT=no/ONBOOT=yes/' /etc/sysconfig/network-scripts/ifcfg-enp0s3
/etc/init.d/network restart
Let’s double check that the network works well so you can continue using the commands:
ip a
ping -c 1 google.com
Software packages update:
yum update -ySoftware packages related to the cluster
We install the packages for the cluster and if necessary finally we eliminate the default cluster:
yum install -y pacemaker pcs httpd wget
pcs cluster destroy --force
Virtualbox Guest Additions (optional)
We restart the vm to use the new kernel after the updates otherwise it will be difficult to compile the “Guest Additions“:
shutdown -r nowThe installation of the “Guest Additions” of VirtualBox takes place by inserting the disk in the VM via the “Devices” menu at the top and then “mounting” the cdrom from the Linux shell:
mount /dev/cdrom /mnt
yum install -y perl gcc dkms kernel-devel kernel-headers make bzip2 tar
/mnt/VBoxLinuxAdditions.run --nox11
End of first part: root node of the cluster
At this point the main configuration is finished, we can turn off the VM to clone it 2 times via the VirtualBox interface in order to have all 3 nodes in the cluster.
shutdown -h nowCluster root node cloning
In the previous paragraph we created node 1 of the cluster now we clone it to immediately obtain node 2 and node 3 then from VirtualBox select our Centos 7 VM and click on the “Clone virtual machine” button


In the “Name” field we enter cl-c7-node-2 for the second node and cl-c7-node-3 for the third node. Also in “MAC Address Policy” we put the option to generate new MAC addresses and finally select “Full Clone“.
If instead we want to make clones from the command line we use:
vboxmanage clonevm cl-c7-node-1 --name="cl-c7-node-2" --register
vboxmanage clonevm cl-c7-node-1 --name="cl-c7-node-3" --register
subsequently we will have 3 Centos 7 vm: cl-c7-node-1, cl-c7-node-2 and cl-c7-node-3 all with the updates made with the cluster software installed (we change the original name of centos7- minimal in cl-c7-node-1).
Ports redirect
If we want to work in the vm by connecting in ssh (so we can copy and paste and have a terminal with the history of the commands) without having to add an additional “hostonly” network card and if we want to see the internal http just launch the following command lines:
VBoxManage modifyvm cl-c7-node-1 --natpf1 "ssh,tcp,,2022,,22"
VBoxManage modifyvm cl-c7-node-1 --natpf1 "http,tcp,,7080,,80"
VBoxManage modifyvm cl-c7-node-2 --natpf1 "ssh,tcp,,3022,,22"
VBoxManage modifyvm cl-c7-node-2 --natpf1 "http,tcp,,8080,,80"
VBoxManage modifyvm cl-c7-node-3 --natpf1 "ssh,tcp,,4022,,22"
VBoxManage modifyvm cl-c7-node-3 --natpf1 "http,tcp,,9080,,80"
So to connect in ssh to node 1 we use:
ssh -p 2022 root@localhostwhile for node 2 and 3 just replace port 2022 with 3022 and 4022
Parallel configuration of the 3 nodes of the cluster
To continue configuring the cluster, we work on each node in parallel, that is, we will execute the same commands on all 3 nodes, that is, based on the node in which we are running the commands, we must replace:
- cl-c7-node-X with the name of the node (for example for the second cl-c7-node-2).
- 192.168.33.1X with the ip associated with the node for the cluster network (for example for the third 192.168.33.13)
- 192.168.43.1X with the ip associated with the node for the fence network (for example for the third 192.168.43.13)
hostname configuration
hostnamectl set-hostname cl-c7-node-X.localhostApache Web Server configuration
Let’s configure Apache Web Server to respond to the cluster agent (relative URL /server-status) and disable it as a systemd service and create a test html page:
cat <<EOF >>/etc/httpd/conf/httpd.conf
<Location /server-status>
SetHandler server-status
Require local
</Location>
EOF
systemctl stop httpd
systemctl disable httpd
We save the existing Apache Web Server courtesy page:
if [ -e "/var/www/html/index.html" ]; then
  mv /var/www/html/index.html /var/www/html/index.html.orig
  chmod 600 /var/www/html/index.html.orig
fi
We add the new courtesy page and to understand better during the switch between one node and the other we use the hostname command to distinguish the page between the 3 nodes.
cat <<EOF >/var/www/html/index.html
<html><head>
<meta charset="UTF-8">
<meta name="viewport" content="width=device-width, initial-scale=1">
<style id='linux-text-cluster-inline-quolltech-css' type='text/css'>
  body {margin: 0;}
  #top { position:fixed; top:86px; left:72px; transform:rotate(90deg); transform-origin:0% 0%; background-color: #f94701; background-image: linear-gradient(to right,#a6a6a6,#c9c925,#1e73be,#fe36f9,#0fe22a,#fe4809); text-align:center; padding:5px; border-radius:5px; opacity:0.9;}
  #top div {font-size:14px;}
  h2 { font-size:20px; margin-bottom:10px; margin-top:10px; }
  #test_frame {width:100vw;height:99vh;border:0px hidden;margin:0;padding:0;}
</style></head>
<body>
<div id="top"> Linux Cluster Test: Cps, Pacemaker, Corosync</h2>
$(hostname) - by Quoll Tech</div></div>
<iframe id="test_frame" src="https://quoll.it/servizi-chiedi-un-preventivo/"></iframe>
<script type="text/javascript">
  function quoll_resize() {
   el=document.getElementById("top");
   el_h=el.offsetHeight;
   el.style.left = el_h +"px";
  }
  quoll_resize();
  window.onresize = quoll_resize;
</script>
</body></html>
EOF
Cluster network configuration
Network interface 192.168.33.0/24
To configure the network we must first check the presence of the network interfaces with the command
ip aand then verify that the network interface (the second after the loopback “lo“) is enp0s8, otherwise we substitute its value for enp0s8 in the following command:
cat <<EOF >/etc/sysconfig/network-scripts/ifcfg-enp0s8
DEVICE="enp0s8"
ONBOOT="yes"
BOOTPROTO=static
IPADDR=192.168.33.1X
NETMASK=255.255.255.0
NM_CONTROLLED=no
TYPE=Ethernet
EOF
/etc/sysconfig/network-scripts/ifup enp0s8
Names of the cluster nodes
echo -e "192.168.33.11\t cl-c7-node-1" >>/etc/hosts
echo -e "192.168.33.12\t cl-c7-node-2" >>/etc/hosts
echo -e "192.168.33.13\t cl-c7-node-3" >>/etc/hosts
hacluster user password
The hacluster user who manages parts of cluster operations must necessarily have the same password on all nodes in order to be authorized to be part of the same cluster.
Suppose that “<very secure password>” is the password to be put to the hacluster user then we use the following command to set it:
echo "hacluster:<password sicurissima>" | chpasswdFence agents configurations
To also manage the fence network and consequently enable the cluster agents that will attempt to shut down or disable a node when that node no longer works well due to one or more faults we must also follow this paragraph.
Fence network interface 192.168.43.0/24
The same reasoning also applies to the fence net so let’s check with the command
ip athat the fence interface (the third after the loopback “lo“) is enp0s9, otherwise we substitute its value for enp0s9 in the following command:
cat <<EOF >/etc/sysconfig/network-scripts/ifcfg-enp0s9
DEVICE="enp0s9"
ONBOOT="yes"
BOOTPROTO=static
IPADDR=192.168.43.1X
NETMASK=255.255.255.0
NM_CONTROLLED=no
TYPE=Ethernet
EOF
/etc/sysconfig/network-scripts/ifup enp0s9
Installation of fence agents
yum install -y "fence-agents-all"Names of nodes in the fence network
echo -e "192.168.43.11\t cl-c7-nodefence-1" >>/etc/hosts
echo -e "192.168.43.12\t cl-c7-nodefence-2" >>/etc/hosts
echo -e "192.168.43.13\t cl-c7-nodefence-3" >>/etc/hosts
Test fence agent
For this test environment we use the agent fence ssh while in production we should use a more appropriate one, perhaps based on the APIs made available by our ups or on the iLO interface if we have an HP or compatible server. Be that as it may, the agent fence will need to be able to shutdown or exclude the node from the cluster physically.
wget -q -O /usr/sbin/fence_ssh https://raw.githubusercontent.com/nannafudge/fence_ssh/master/fence_ssh
chmod +x /usr/sbin/fence_ssh
For the “fence_ssh” agent to work correctly, it must be able to connect to the other 2 nodes on the fence network but not on the cluster network or on the NAT network (where the fault could occur).
Let’s create, consequently, a special user with the same password for all nodes”<very secure password fence>“:
useradd -c "Fence ssh user" -m -s /bin/bash fence
echo "fence:<very secure password fence>" | chpasswd
To the newly created fence user we give him the rights with sudo to shutdown the server:
cat <<EOF >/etc/sudoers.d/fence
fence ALL = NOPASSWD: /sbin/shutdown
EOF
so you can use both “/sbin/shutdown -r” to reboot and “/sbin/shutdown -h” to shutdown the vm.
For security, even if it should already be active, we enable the use of ssh with password if not active:
sed -i 's/^PasswordAuthentication.*/PasswordAuthentication yes/' /etc/ssh/sshd_config
systemctl restart sshd
Authentication in ssh without password with private/public key:
Key generations (to be done only on a single node such as the cl-c7-node-1)
su - fence
rm -rf .ssh
ssh-keygen -q -C "fence_agent_key" -f $HOME/.ssh/id_rsa -N ''
cp -a .ssh/id_rsa.pub .ssh/authorized_keys
cat <<EOF >.ssh/config
Host 192.168.43.* cl-c7-nodefence-*
StrictHostKeyChecking no
EOF
chmod 600 .ssh/config
exit
Key copy in the 2 remaining nodes (cl-c7-node2 and cl-c7-node-3)
You have to copy the .ssh folder of the fence user to the other 2 nodes, for this purpose let’s assume that you are in node 1 (cl-c7-node-1) and that both nodes 2 and 3 are turned on and have configured the node at least until in the previous paragraph relating to the fence user:
su - fence
tar cf - .ssh | ssh fence@cl-c7-nodefence-2 tar xf - --warning=no-timestamp
tar cf - .ssh | ssh fence@cl-c7-nodefence-3 tar xf - --warning=no-timestamp
exit
Having done this from any of the 3 nodes with the fence user you should be able to enter ssh on the other 2 nodes, without a password using the public key, so that the fence_ssh agent works correctly.
Let’s try to do a test for example from node 2 connecting in ssh on node 1 and 3:
ssh fence@cl-c7-nodefence-1 hostname
ssh fence@cl-c7-nodefence-3 hostname
Firewall
Firewall enabling
systemctl unmask firewalld
systemctl start firewalld
systemctl enable firewalld
SSH: Firewall rules
firewall-cmd --permanent --add-service=ssh
firewall-cmd --add-service=ssh
Cluster: Firewall rules
firewall-cmd --permanent --add-service=high-availability
firewall-cmd --add-service=high-availability
Apache Web Server: Firewall rules
firewall-cmd --permanent --add-service=http
firewall-cmd --add-service=http
Activate the service for the cluster
systemctl start pcsd.service
systemctl enable pcsd.service
Cluster and agents configuration
This configuration part must be done on a single node after all the previous configurations have been made on all 3 nodes.
So suppose we work on node 1.
cluster_nodes="cl-c7-node-1 cl-c7-node-2 cl-c7-node-3"
echo -e "\tinizializing the cluster on nodes ${cluster_nodes}"
pcs cluster auth ${cluster_nodes} -u hacluster -p "<password sicurissima>"
pcs cluster setup --start --name "quolltech_cluster" ${cluster_nodes} --force
pcs cluster enable --all
# disable stonith
pcs property set stonith-enabled=false
sleep 5
and if everything went well the cluster should be active and configured on all 3 nodes and finally to check the status we try the command:
pcs cluster status
pcs status
pcs quorum status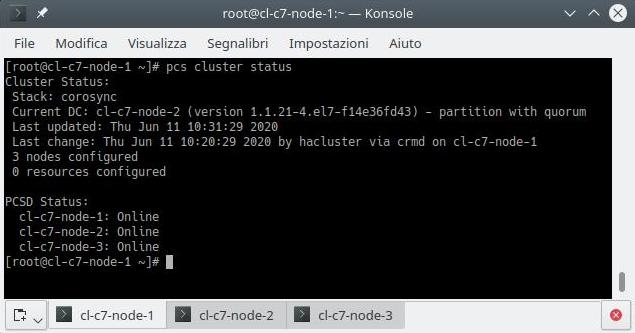
pcs cluster status 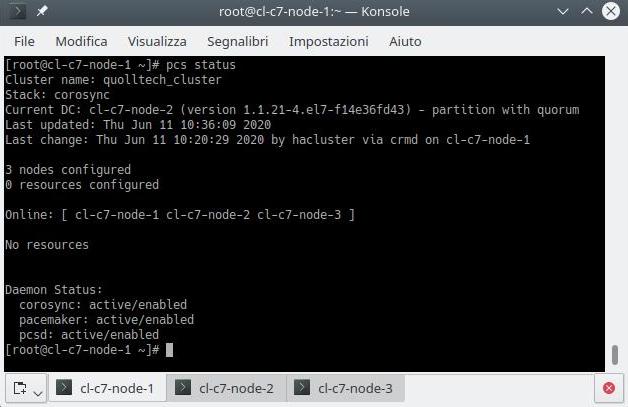
pcs status 
pcs quorum status
If something does not work perhaps because a node is “OFFLINE” we try to check in that node if all the firewall rules are active especially that of the “high-availability” service.
Suppose that the problem occurs on node 2 in order to launch the command:
firewall-cmd --list-alland therefore if the firewall rule is missing, enable it according to the paragraph above.
Add resources to cluster
httpd_conf="/etc/httpd/conf/httpd.conf"
pcs resource create first_test_ip IPaddr2 ip=192.168.33.31 cidr_netmask=24 --group apachegroup
pcs resource create Web1 apache configfile="$httpd_conf" statusurl="http://127.0.0.1/server-status" --group apachegroup
pcs resource create second_test_ip IPaddr2 ip=192.168.33.32 cidr_netmask=24 --group group_second_test_ip
pcs resource create last_test_ip IPaddr2 ip=192.168.33.33 cidr_netmask=24 --group group_last_test_ip
In summary we have created 3 groups of resources (or resource groups):
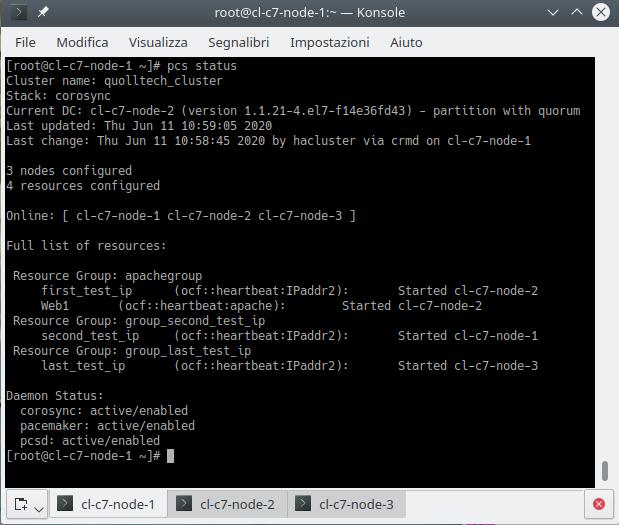
- apachegroup
with 2 resources, the first of type IPaddr2 with name first_test_ip and the other of type apache with name Web1; - group_second_test_ip
similarly with a resource of type IPaddr2 with name second_test_ip; - group_last_test_ip
with a resource of type IPaddr2 with name last_test_ip.
So let’s check with the command:
pcs statusAdd fence resources
pcs stonith create stonith-ssh-1 fence_ssh user=fence sudo=true private-key="/home/fence/.ssh/id_rsa" hostname="cl-c7-nodefence-1" pcmk_host_list="cl-c7-node-1" --force --disabled
pcs stonith create stonith-ssh-2 fence_ssh user=fence sudo=true private-key="/home/fence/.ssh/id_rsa" hostname="cl-c7-nodefence-2" pcmk_host_list="cl-c7-node-2" --force --disabled
pcs stonith create stonith-ssh-3 fence_ssh user=fence sudo=true private-key="/home/fence/.ssh/id_rsa" hostname="cl-c7-nodefence-3" pcmk_host_list="cl-c7-node-3" --force --disabled
For each fence resource we make sure that it does not activate in the node itself, which generally doesn’t make much sense:
pcs constraint location stonith-ssh-1 avoids cl-c7-node-1
pcs constraint location stonith-ssh-2 avoids cl-c7-node-2
pcs constraint location stonith-ssh-3 avoids cl-c7-node-3
We enable fence resources with constraints so that they start in a right node (for example “stonith-node-1” will have to start either on node 2 or on 3, while “stonith-node-2” will have to start either on node 1 or on 3):
pcs stonith enable stonith-ssh-1
pcs stonith enable stonith-ssh-2
pcs stonith enable stonith-ssh-3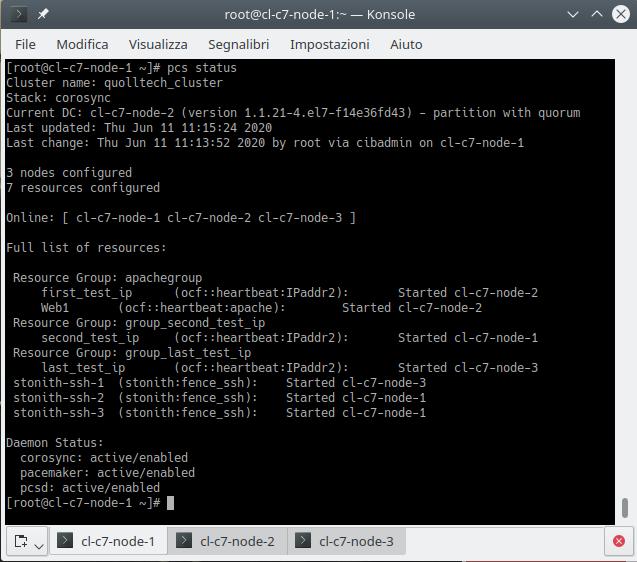
At this point we can enable the cluster to use the fence agent (we had previously disabled it to avoid errors since the fences had not been configured):
pcs property set stonith-enabled=trueFunction tests
Cluster state
At this point the cluster is ready and working, we can use the following commands to see the status of the cluster and related resources:
pcs cluster status
pcs status
pcs quorum status
We can also verify that the resources are actually active in the respective nodes.
For example if the “second_test_ip” resource is active in node 1 then from that node we can launch the command
ip ato verify that the ip is actually active.
Same thing also applies to the resource “first_test_ip” and “last_test_ip“.
To check the “Web1” resource which of course must be on the same node as “first_test_ip” because they are part of the same group “apachegroup” just go with your browser to the address:
- http://localhost:7080/ if “Web1” is on node 1;
- http://localhost:8080/ if “Web1” is on node 2;
- http://localhost:9080/ if “Web1” is on node 3.
If the web page does not work, you need to go back in order to review the steps in the paragraph on redirecting ports.
Also for the stoniths, that is the fence agents, we check that they started on the node other than the one to be controlled.
For example “stonith-ssh-2″ which checks node 2 must not absolutely start on node 2.
Tests
As a function test we can try to migrate a service from one node to another, for example we try to migrate “last_test_ip” from node 3 to node 2 by connecting to any of the nodes in order to use the command:
pcs resource move last_test_ip cl-c7-node-2
pcs status
Another test could be to simulate a problem on a node and verify that the fence agent activates and shuts down the problematic node and services are redistributed.
Use pcs command directly to simulate a problem on node 3 so let’s do it from node 1 or 2:
pcs stonith fence cl-c7-node-3
pcs status
With these commands, a “fence” will be initialized at node 3 so as to make it reboot the node.
It could be that in the status (pcs status) it complies that there is a “Timeout” for the test on the resource “stonith-ssh-3” in order to warn us for what reason the “fence” was made to the node.
So if you want to remove this note from the state just run the command:
pcs stonith cleanup stonith-ssh-3If, instead of rebooting the node, we want it to be turned off then add the –off option to the previous command
pcs stonith fence cl-c7-node-3 --off
pcs status
After that a test to simulate hardware error could be to disconnect the cable of the cluster network of a node.
For example to node 2 via the VirtualBox graphical interface or with the command (external to the cluster):
VBoxManage controlvm cl-c7-node-2 setlinkstate2 offand check that node 2 is put “OFFLINE” by the cluster and then that node 2 reboots caused by the fence agent.
If we want the fence agent to turn off the node (instead of the reboot) just put the “stonith-action” cluster property to “off” instead of the default “reboot“.
pcs property set stonith-action=offSummary
In this article, to summarize we have seen how to test a 3 nodes cluster on Linux Centos 7 distribution.
During the next article, which is the continuation, we automate all using Vagrant.
In addition, we will see how to install it also on Ubuntu 18.04 LTS and with LXD type containers.
Finally, again thanks to Vagrant we will see how it will be possible to add or remove nodes to the cluster, whether or not to use the “fence” network, change the network IPs, or do the initial software upgrades (all parameterizable with Vagrant).
In conclusion, for those who do not want to read the whole next article simply see my project “linux-cluster-test” on Github.
References
- Vagrant to install, configure and manage virtual machine;
- Virtualbox to virtualize vm;
- Virtualbox Guest Additions (we can download directly the iso image from this link subsequently checking the correct version of Virtualbox);
- LXD is a next generation system container manage;
- Pacemaker is an open source, hight availability resource manager suitble for both small and large cluster;
- The Corosync Cluster Engine is a Group Communication System with additional features for implementing high availability within applications;
- Fence Agent fence_ssh to test the cluster agent fence;
- Pcs is a Corosync and Pacemaker configuration tool;
- Configuring the Red Hat High Availability Add-On with Pacemaker;
- linux-cluster-test on Github;
- Ubuntu 18.04 LTS;
- Centos 7;
- RedHat;
- Fence agent for iLO;
- systemd.